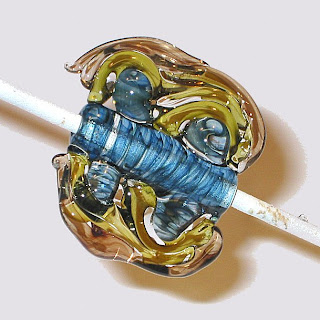
Beads of Courage is an incentive program for children undergoing medical treatment such as cancer and cardiac treatments. The beads "support and strengthen the protective resources in children coping with serious illness. Through the program children tell their story using colorful beads as meaningful symbols of courage that commemorate milestones they have achieved along their unique treatment path." (http://www.beadsofcourage.org/pages/beadsofcourage.htm)
Check out their website for more information on their program, to see videos of children and their beads, to see how to donate your beads and for a events and fundraising.
Why butterflies? Butterflies are given to the parents after a child dies. It is very hard for beadmakers to make these beads. It is difficult to think about why you need to make them and very touching to make a final bead.
Below are the steps I use to make these beads. I was never happy with my butterflies until I tried using my Gaffer and Val Cox veiled cane. Nikki Carollo posted some butterfly beads on LampworkEtc and a light bulb went off in my head. I have lots of veiled cane. I tweaked her design a little and came up with this way of making these beads. Feel free to use my tutorial for beads of your own to send to Beads of Couarge.
 Wrap mandrel with first color of glass to form a tube shape. Make sure the ends are dimpled nicely as it will not be possible to return to the ends to make them smooth easily.
  Use the same color of glass to make four tall dots to form the beginnings of the wings.
 Take your second color of glass and wrap around the raised dots. You can see here the bottom side is done and the topside I started in the middle of t he dots. I like doing this so I can use the molten glass to get into all the edges. If needed add some glass to make the two wings the same size.
  Use your third color and stripe it down the sides of the wings to build up more height on the wings.
  Heat in the center of the wing on side.
  Use a razor tool, stump shaper or simlar tool to crease between the wings. Repeat on the other side.
  Heat one wing and use parallel mashers or tweezer to flatten the wings.
  Here all wings are mashed.
  Heat each wing and use tweezers to make ridges in the wings. You may need to heat and tweeze a couple times on each wing, if you are not fast enough. I like to start in the center of the wing and move to the left, then go back and finish on the right.
  Finished butterfly.


7 comments:
Great tute Lara!
Oooooh, thank you so so much Lara for this lovely tutorial. Your butterflies are just so cute.
Can't wait to try it.
Thank you for sharing Beads of Courage on your blog. We are thrilled the artists like yourself are committed to providing healing in this way! We appreciate your time, energy and talent and of course the beautiful butterflies!
Thank you!
Colin Smith, RN
Program Director
Beads of Courage, Inc.
Thanks Colin and Lea
Colin, feel free to link to this tutorial or copy for your tutorial page.
Thanks NJ
Your tute is awesome, and the results are amazing! Thank you so much for sharing! I've sent beads to BOC, but I never felt my butterflies were up to par. I'm going to have to try again now - I'm totally inspired.
Thanks for tut Lara. I love your tweezer addition to the wings. Brilliant.
Post a Comment